How to Fix 404 Errors: The Ultimate Guide to Reclaiming Lost Traffic & Rankings
Imagine a potential customer clicks a link to your site, eager to buy. But instead of your amazing product, they’re greeted by a stark, disappointing message: “404 Not Found.” In that single moment, you’ve likely lost a sale, damaged your brand’s reputation, and frustrated a user. This is the silent killer of websites, and learning how to fix 404 errors is not just a technical task—it’s a critical business strategy.
A 404 error is more than just a digital dead-end. It’s a signpost to search engines like Google that your site is poorly maintained, leading to wasted “crawl budget” and the loss of precious “link equity” from other websites. But don’t worry. This comprehensive guide will demystify the process. We will show you exactly how to fix 404 errors, find them, and implement the right redirects to turn these digital roadblocks into valuable pathways, boosting both user experience and your SEO performance.
What Exactly is a 404 Error? (The Simple Explanation)
In the simplest terms, a 404 Not Found error is an HTTP status code that means the server could not find the requested resource. It’s like sending a letter to an address that no longer exists. The post office (the server) gets your request, but it knows the house (the webpage) is gone. You can learn more about HTTP status codes from resources like the Mozilla Developer Network (MDN). This guide is your definitive resource on how to fix 404 errors and understand their root causes.
This happens when a user tries to access a URL that:
- Has been deleted or moved without a proper redirect.
- Was typed incorrectly into the browser’s address bar.
- Points to a link on another site that is now broken.
Key Takeaway: A 404 error tells both users and search engines that a specific page is permanently missing from its expected location. Your primary goal is to guide them to the right place.
404 vs. “Soft 404”: A Crucial SEO Distinction
It’s vital to understand the difference between a true 404 and a “Soft 404”. A true 404 returns a `404` status code. A Soft 404 is a page that looks like a 404 page (e.g., it says “Page not found”) but returns a `200 OK` status code. This confuses Google, as it’s being told a non-existent page is actually a real, functioning page. This is a common issue with poorly configured custom error pages and is something you must avoid when you fix 404 errors. Understanding this distinction is key to proper technical SEO.
Why Ignoring 404 Errors is a Costly Mistake
Letting 404 errors pile up is like ignoring small leaks in a dam. Eventually, the structural integrity of your SEO and user experience will fail. Here’s why taking the time to learn how to fix 404 errors is so important. Understanding how to fix 404 errors is therefore a fundamental aspect of maintaining a healthy online presence.
1. It Creates a Terrible User Experience (UX)
This is the most immediate impact. A user who lands on a 404 page is met with confusion and frustration. They came to your site for a reason, and you’ve failed to deliver. This leads to:
- Increased Bounce Rate: The user will likely hit the “back” button immediately, sending a negative signal to Google.
- Loss of Trust: A site full of broken links appears unprofessional and neglected.
- Lost Conversions: That 404 could have been a product page, a contact form, or a blog post that converts a reader into a customer. Every error is a potential lost sale or lead.
2. It Wastes Your “Link Equity”
Backlinks are the currency of SEO. When another reputable site links to your page, they pass “link equity” (or “link juice”), which is a major ranking factor. If that page on your site returns a 404 error, that link equity doesn’t just disappear—it evaporates. It’s like having a bank account that’s slowly leaking money. By learning how to fix 404 errors with a 301 redirect, you can redirect that equity to a new, relevant page, preserving its value. Moz provides an excellent deep dive into the concept of link equity. This is a critical part of any broader SEO strategy, which should also include targeting high search volume, low competition keywords.
3. It Harms Your Search Engine Rankings
Google’s goal is to provide the best possible results for its users. A site riddled with 404s is the opposite of a good user experience. Therefore, Google may:
- De-index the broken pages: The pages will disappear from search results, meaning you lose any organic traffic they were receiving and any SERP features they may have occupied.
- Lower your overall site authority: A high number of 404s can be seen as a sign of a low-quality, poorly maintained site, negatively impacting your rankings for other keywords.
- Waste Crawl Budget: Google has a limited amount of time it will spend crawling your site (crawl budget). If it’s wasting time crawling non-existent 404 pages, it’s not crawling your important, indexable pages.
Step 1: How to Find 404 Errors on Your Website
You can’t fix what you can’t find. Before you can learn how to fix 404 errors, you need to become a detective and hunt them down. Here are the best tools and methods for the job. These are often grouped with other crawl errors that you should regularly monitor. The first logical step in any plan on how to fix 404 errors is to conduct a thorough audit.
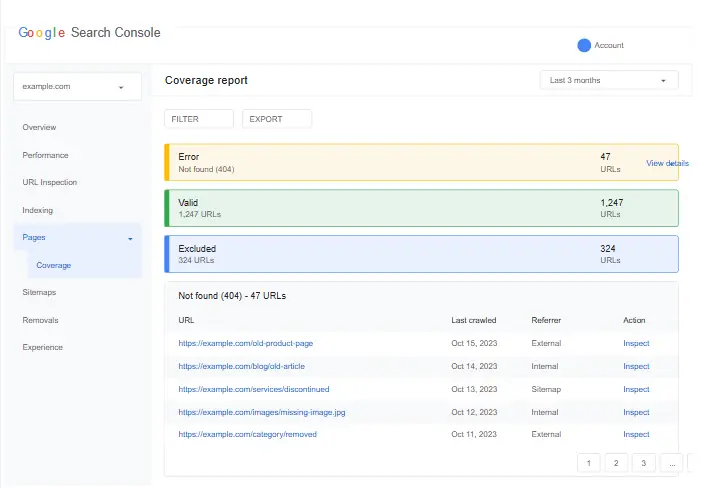
1. Google Search Console (The Most Important Tool)
Google Search Console is your free, direct line of communication with Google. It’s the first place you should look.
- Log in to your Google Search Console account.
- Select the property (website) you want to check.
- Navigate to Pages > Not found (404) under the “Indexing” section in the new interface, or Crawl > Crawl Errors > Not Found in the old interface.
This report will show you all the URLs on your site that Google has tried to crawl but found to be 404s. It will also show you the linked from pages, which is incredibly useful for tracking down where the broken link exists.
2. Use a Website Crawler Tool (Screaming Frog SEO Spider)
For a more in-depth analysis, a desktop crawler like Screaming Frog SEO Spider is the industry standard. The free version allows you to crawl up to 500 URLs, which is enough for smaller sites.
- Download and open Screaming Frog.
- Enter your website URL and start the crawl.
- Once the crawl is complete, go to the Response Codes tab and filter for Client Error (4xx). This will show you every 404 error the spider found on your site.
This method is excellent for finding internal 404s that Google might not have discovered yet. This is a critical step in the process of how to fix 404 errors comprehensively.
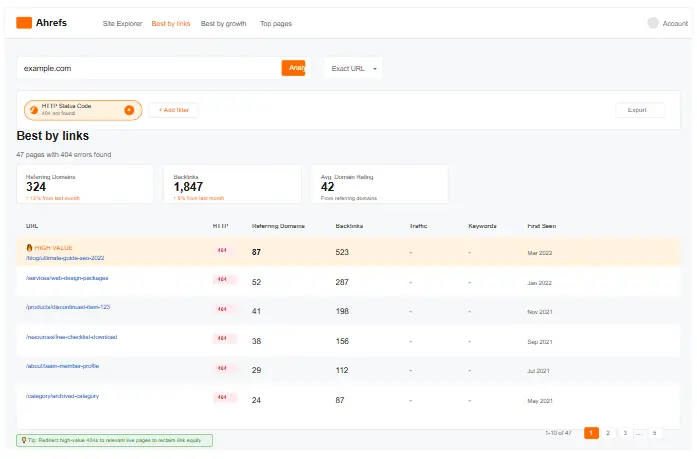
3. Check Your Backlink Profile (Ahrefs, SEMrush)
This is a proactive approach to find 404s that are costing you the most link equity. Use a backlink analysis tool to see which broken pages on your site have the most backlinks pointing to them.
In Ahrefs:
- Enter your domain into Ahrefs’ Site Explorer.
- Navigate to Best by links > Broken links.
This report is gold. It shows you the 404 pages that have the most powerful backlinks, allowing you to prioritize which ones to fix first for the biggest SEO impact. This is a crucial part of any strategy on how to fix 404 errors. Ahrefs has a great guide on this process.
Step 2: The Ultimate Guide on How to Fix 404 Errors
You’ve found your list of 404 errors. Now what? It’s time to fix them. But “fixing” a 404 isn’t a one-size-fits-all solution. You need to diagnose the cause and choose the right remedy. Here is your simple decision-making guide for how to fix 404 errors. This decision-making framework is designed to simplify the process of how to fix 404 errors for any situation.
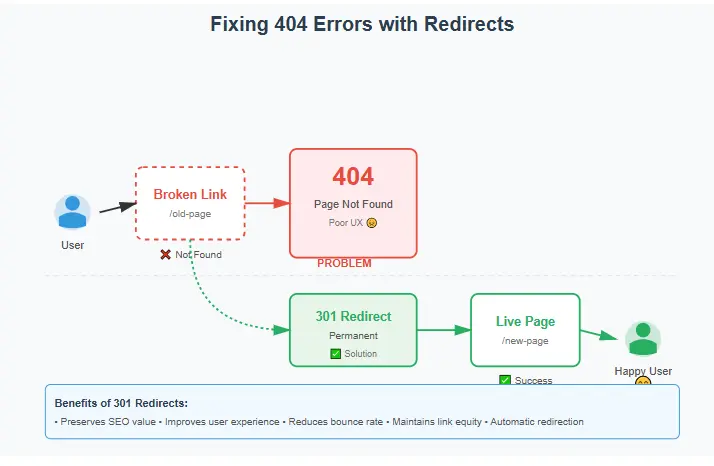
Scenario A: The Page Has a New, Relevant Home (Use a 301 Redirect)
This is the most common and best-case scenario. You’ve deleted or moved a page, but there’s another page on your site that serves the same or a very similar purpose.
Example: You updated your blog post from `yourblog.com/seo-tips-2023` to `yourblog.com/ultimate-seo-guide-2024`. The old URL is now a 404.
The Solution: 301 Permanent Redirect.
A 301 redirect is a permanent instruction that tells both browsers and search engines that a page has moved to a new URL forever. It passes approximately 90-99% of the original page’s link equity to the new page. This is the cornerstone of how to fix 404 errors for SEO. Moz’s guide on redirection explains this in great detail.
When to use a 301 redirect:
- You’ve moved a page to a new URL.
- You’ve merged two or more pages into one.
- You’ve changed your site’s URL structure (e.g., from HTTP to HTTPS).
- You’ve acquired a new domain and want to redirect traffic from the old one.
Scenario B: The Page is Gone and There’s No Replacement (Use a 410 or Custom 404)
Sometimes, a page is just gone for good. Maybe it was for a product you no longer sell, or an event that has passed.
Example: You had a page for `yourstore.com/black-friday-2022-deal`. That deal is long gone.
The Solution 1: 410 Gone Status Code.
A 410 status code tells search engines that a page is intentionally and permanently gone. It’s a stronger signal than a 404. While a 404 implies the page might be back, a 410 says “don’t bother looking for this again.” This can help Google remove the URL from its index faster. However, implementing a 410 can be more technically complex than other methods and is a less common approach to how to fix 404 errors.
The Solution 2: A Helpful Custom 404 Page.
If you can’t redirect a user to a relevant page, the next best thing is to guide them from your 404 page. A default browser 404 page is a dead end. A custom 404 page is a safety net that can rescue the user experience.
What makes a great custom 404 page?
- A friendly, apologetic message: Acknowledge the error and use a bit of brand personality.
- A clear explanation: Briefly explain that the page they’re looking for can’t be found.
- Helpful links: Provide links to your most popular pages, your homepage, your blog, or your contact page.
- A search bar: Allow users to search for what they were looking for directly from the error page.
- Keep the site’s navigation: Don’t strand them. Keep your main menu visible so they can easily navigate elsewhere.
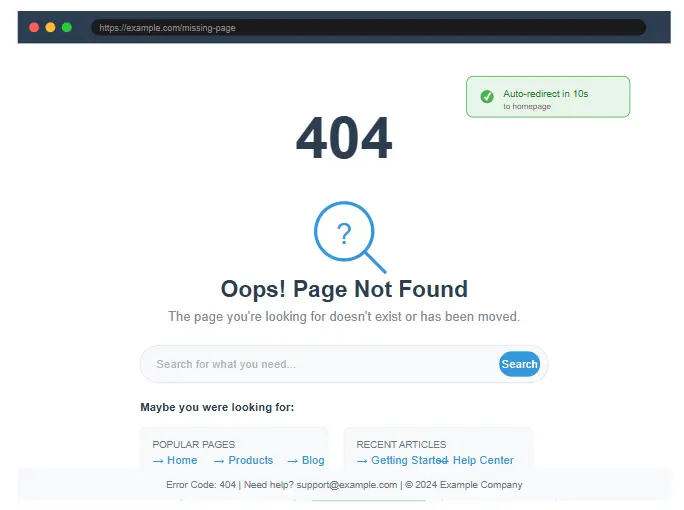
Pro-Tip: The goal of a custom 404 page is to reduce frustration and keep the user on your site. Don’t just tell them they’re lost; give them a map.
Step 3: How to Implement 301 Redirects (The Technical “How-To”)
Now for the hands-on part. Here’s how to fix 404 errors by implementing 301 redirects on the most common platforms. Remember to always back up your website before making any changes to server files. This section provides the practical, step-by-step instructions on how to fix 404 errors using 301 redirects.
1. Using the .htaccess File (for Apache Servers)
If your website runs on an Apache server (very common for shared hosting), you can use the `.htaccess` file in your website’s root directory.
- Access your website’s files via FTP or your hosting control panel’s File Manager.
- Find the `.htaccess` file. If you can’t see it, make sure your settings are set to show hidden files.
- Download a backup copy of the file to your computer.
- Edit the file and add the following line of code for each redirect:
Redirect 301 /old-page-url.html https://www.yourwebsite.com/new-page-url.htmlImportant: The first part is the path from the root directory (no domain), and the second part is the full, absolute URL of the new page. This is a powerful method for how to fix 404 errors on Apache servers.
2. Using Nginx Server Configuration
If your site is on an Nginx server, you’ll need to add a redirect rule to your server block configuration file.
location /old-page-url {
    return 301 https://www.yourwebsite.com/new-page-url;
}
This requires server-level access, so you may need to contact your hosting provider or developer for help with how to fix 404 errors on an Nginx setup.
3. Using a WordPress Plugin (The Easiest Way)
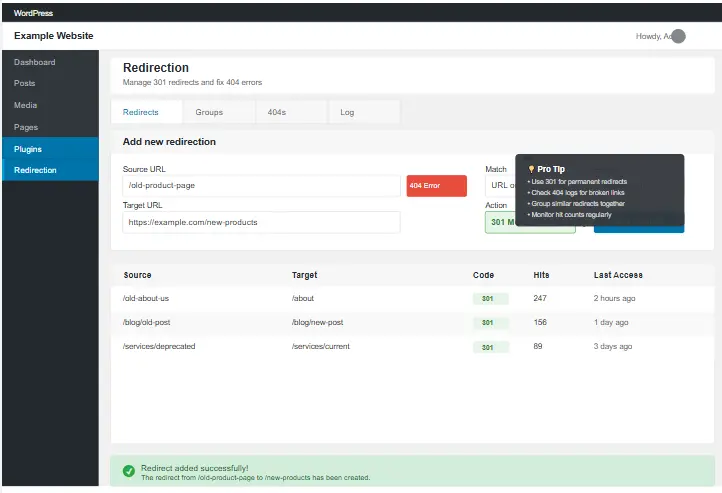
If you use WordPress, you’re in luck. You can manage redirects without touching a single line of code.
Recommended Plugin: Redirection
- Install and activate the “Redirection” plugin from the WordPress repository.
- Navigate to Tools > Redirection.
- Under Add new redirection, enter the old URL in the Source URL box.
- Enter the new URL in the Target URL box.
The plugin will automatically handle the code and ensure your 301 redirect is working correctly. This is by far the simplest method for WordPress users to fix 404 errors.
4. Using Shopify
Shopify also has a built-in URL redirect manager that simplifies how to fix 404 errors on their platform.
- From your Shopify admin, go to Online Store > Navigation.
- Click the View URL redirects button.
- Click Add URL redirect.
- In the Redirect from box, enter the old path (e.g., `/blogs/news/old-post`).
- In the Redirect to box, enter the new path (e.g., `/blogs/news/new-post`). For more details, see the Shopify Help Center.
How to Proactively Prevent 404 Errors
The best way to fix 404 errors is to prevent them from happening in the first place. A proactive approach will save you countless hours and protect your SEO in the long run.
1. Plan Carefully for Site Redesigns & Migrations
Most 404 errors are born during a site redesign or platform migration. Before you launch, crawl your existing site and export a list of all live URLs. After the new site is built, map every old URL to its corresponding new URL. This way, you can implement all the necessary 301 redirects before the new site goes live, ensuring a seamless transition for users and search engines. This planning is the most professional way to manage how to fix 404 errors before they start.
2. Don’t Change URLs Unnecessarily
Once a URL is indexed and earning links, it’s a valuable asset. Avoid changing URLs unless absolutely necessary (e.g., for a major restructuring). If you must change a URL, always implement a 301 redirect. This is a fundamental rule of how to fix 404 errors and maintain SEO value.
3. Regularly Check for Broken Links
Make it a monthly or quarterly habit to run a crawl of your site with a tool like Screaming Frog. This will help you catch new 404s before they become a major problem. For WordPress users, plugins like “Broken Link Checker” can automate this process and notify you of new broken links, making the process of how to fix 404 errors much more manageable.
Feeling Overwhelmed? Get Our FREE 404 Fix Checklist!
We’ve boiled down this entire guide into a simple, actionable checklist. Enter your email below to get instant access and start fixing errors today.
Conclusion: Take Control of Your Website’s Health
Learning how to fix 404 errors is not a one-time task; it’s an ongoing part of good website hygiene. These errors are more than minor annoyances—they are direct threats to your user experience, your SEO authority, and your bottom line. By now, you should have a complete understanding of how to fix 404 errors and why it’s so crucial for your site’s success.
By using tools like Google Search Console to find them, implementing smart 301 redirects to preserve link equity, and creating helpful custom 404 pages as a safety net, you can transform these digital dead-ends into opportunities. You’ll retain more visitors, satisfy search engines, and ensure that every path to your website leads to a positive experience. Start your audit today, and take the first step towards a healthier, more profitable website. The journey to fully understanding how to fix 404 errors is a journey to a better web presence.
Frequently Asked Questions (FAQ)
Yes, they can. While a few 404s are normal, a large number of them can harm your SEO by wasting crawl budget, causing a loss of link equity, and signaling to Google that your site is of low quality. This is why knowing how to fix 404 errors is a vital skill.
Zero is the ideal number. However, a few 404s on a large, dynamic site are inevitable. The key is to be proactive. Regularly check for them and fix the important ones—especially those with backlinks or high traffic—as quickly as possible. Your strategy for how to fix 404 errors should be prioritized by impact.
No, this is a bad practice. Redirecting a non-relevant 404 page to your homepage is called a “soft 404” and can confuse users and search engines. It’s a poor user experience to be looking for a specific product and end up on a generic homepage. Only redirect to a page that is highly relevant to the original content. This is a common mistake when people first learn how to fix 404 errors.
A 301 redirect is permanent and passes most of the SEO value (link equity) to the new page. A 302 redirect is temporary and tells search engines to keep the original URL indexed and to pass little to no SEO value. You should almost always use a 301 redirect when fixing 404 errors. This guide from Ahrefs explains the difference well.